
Navigation stacks are a fundamental user interface component in iOS. We use them everyday as we tap in and out of messages in Mail, search our contacts to make a phone call, and adjust the settings on our phones. Being so crucial to the user experience, I was a bit surprised to find a navigation related bug in SwiftUI. Navigation titles from dismissed views were piling up at the top of the navigation bar in an overlapping mess. What the heck?! Here, we will go over sample code that both recreates this behavior and demonstrates current fixes.
Based on XCode v12.3 and SwiftUI 2.0
Feel free to fire up XCode and start a new project or if you are feeling lazy download the completed demo here.
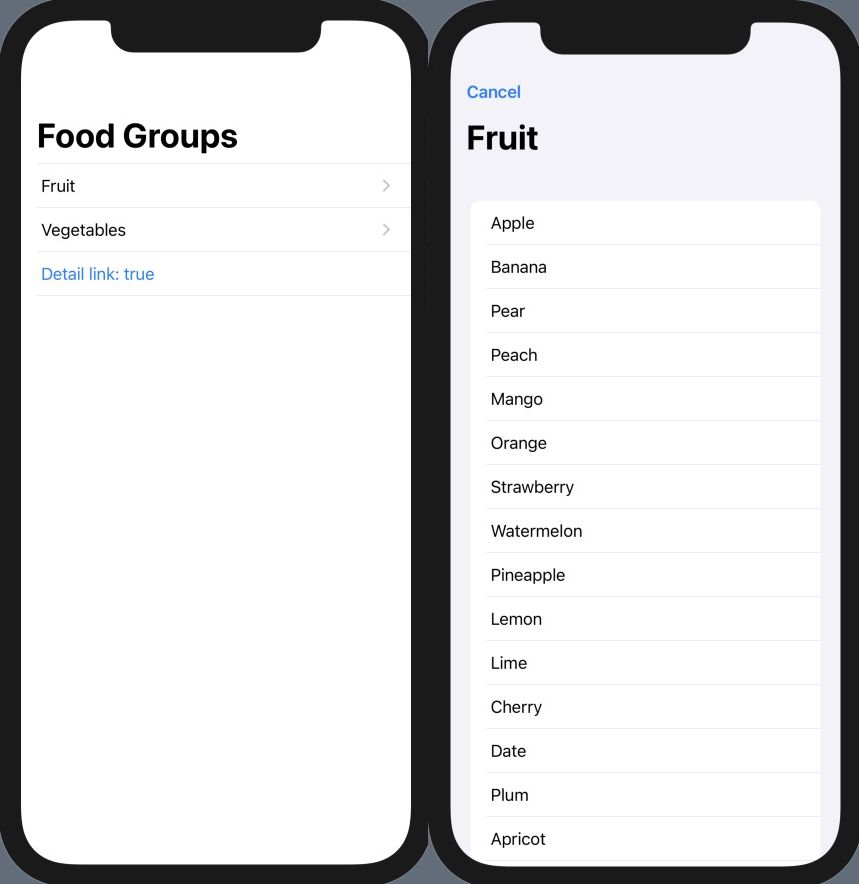
FoodGroups Demo
To recreate the overlapping title phenomenon we will code up a small demo app that lets users explore food groups. There will be two views in the app. Our primary ContentView will display a list with two categories, fruits and vegetables. Tapping a food group will navigate to a detailed list of example foods. We won’t code up additional user interaction, but let’s assume in our detailed view we expect the user to edit the content, so we will want to provide mechanisms to save or cancel changes.
Here is the code for a simple data model and main ContentView:
struct FoodGroup {
    var name: String
    var examples: [String]
}

struct ContentView: View {
    var foodGroups: [FoodGroup] {
        let fruits = FoodGroup(name: "Fruit", examples: ["Apple", "Banana", "Pear", "Peach", "Mango", "Orange", "Strawberry", "Watermelon", "Pineapple", "Lemon", "Lime", "Cherry", "Date", "Plum", "Apricot", "Blueberry", "Blackberry", "Cranberry", "Kiwi", "Nectarine"])
        let vegetables = FoodGroup(name: "Vegetables", examples: ["Lettuce", "Carrot", "Beet", "Broccoli", "Corn", "Celery", "Chicory", "Kale", "Spinach", "Yarrow", "Brussels sprouts", "Arugula", "Cauliflower", "Turnip", "Sweet Potato"])
        return [fruits, vegetables]
    }

    @State var isDetailLink = true
    var body: some View {
        NavigationView {
            List {
                ForEach(foodGroups, id: \.name) { foodGroup in
                    NavigationLink(
                        destination: DetailView(foodGroup: foodGroup),
                        label: {
                            Text(foodGroup.name)
                        })
                        .isDetailLink(isDetailLink)
                }
                Button(action: {isDetailLink.toggle()}, label: {
                        Text("Detail link: \(String(isDetailLink))")
                })
                .buttonStyle(BorderlessButtonStyle())

            }
            .navigationTitle(Text("Food Groups"))
        }
    }
}
This code should look fairly straightforward. We have a simple struct FoodGroup for our data model, a List to display our food groups, and a NavigationLink on each item that will display examples of each food in DetailView. The only thing to note here is the addition of the “Detail link” button at the bottom of the list. Clicking detail link toggles whether the.isDetailLink modifier is true or false for the NavigationLink. We will revisit this button when we talk about fixes and what effect this has on the resulting UI.
The code for the second view of the app is as follows:
struct DetailView: View {
    @Environment(\.presentationMode) var presentationMode
    var foodGroup: FoodGroup
    @State var navDisplayMode: NavigationBarItem.TitleDisplayMode = .large
    var body: some View {
        Form {
            ForEach(foodGroup.examples, id: \.self) { foodName in
                Text(foodName)
            }
            Button(action: {
                if navDisplayMode == .large {
                    navDisplayMode = .inline
                } else {
                    navDisplayMode = .large
                }
            }, label: {
                Text("Nav Display Mode: \(navDisplayMode == .large ? "large" : "inline")")
            })
            HStack {
                Spacer()
                Button(action: {dismissView()}, label: {
                        Text("Save")
                    })
                Spacer()
            }
        }
        .navigationBarTitle(foodGroup.name, displayMode: navDisplayMode)
        .navigationBarBackButtonHidden(true)
        .navigationBarItems(leading: Button(action: {self.dismissView()}, label: {
            Text("Cancel")
        }))
    }

    func dismissView() {
        self.presentationMode.wrappedValue.dismiss()
    }
}
In DetailView we are using a Form to display the name of each food in the food group. The back button in the navigation bar has been hidden using .navigationBarBackButtonHidden(true) and in it’s place we have added a Cancel button. All that cancel does is dismiss the view in this example, but we might imagine pressing cancel calls an undo manager reverting some state in our application. Similarly, we have a save button at the bottom of the view that dismisses the view. Again, let’s imagine that we persist changes in state to our data model when pressing this button. The last thing to note is the ‘Nav Display Mode’ button. Tapping this button toggles the navigation title display mode between .large and .inline.
Our app is now complete, so let us explore the overlapping title phenomenon and fixes.
Demonstrating the behavior
To demonstrate the overlapping title behavior:
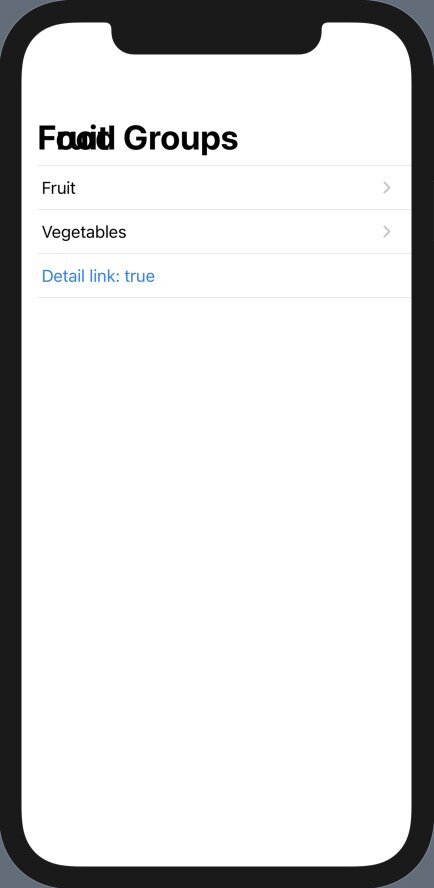
Start an interactive preview by pressing the play button in the Canvas window.
Click the list row labeled Fruit.
Scroll to the bottom of the list of fruits and click save.
If you don’t see anything on your first try keep moving back and forth between the main view and detail view a few times, being sure to scroll down in the view so that the navigation title shrinks and centers itself in the top of the navigation bar. Eventually you will start to see overlapping text in the navigation title.
As far as I can tell, this bug only shows up if you: 1) have the navigation title displayMode of a destination view set to .large and 2) have added items to the navigation bar using the .navigationBarItems modifier.
Fixes
1. Add the .isDetailLink modifier to your NavigationLink view and pass false.
If you aren’t familiar .isDetailLink dictates the view presentation behavior on iPads and Macs. When .isDetialLink is true (default) child views are presented next to the sidebar and when .isDetialLink is false the new view replaces the old view in the sidebar. So, if you are building a catalyst app or wish to support both iPhones and iPads this probably isn’t the best option.
2. Set the navigation display mode explicitly to be .inline in the detail view. To do this you can use the .navigationBarTitleDisplayMode or .navigationBarTitle(_, displayMode: _ ) modifiers.
You can test out both of these fixes in the Canvas preview using the extra buttons we coded in earlier. (You may need to start and stop your live preview to clear title text that is already stuck on the screen)
And there you have it. Another SwiftUI bug swept under the rug!